Creating issues in DevOps is easy enough, but frequently issues arise from an email received from the business users, with much the same details as you’d need to put in DevOps. Instead of copy/pasting, it would be good to just forward the email to DevOps, or setup a dedicated mailbox, so user incident reports automatically create a DevOps issue.
Power Automate has all the ingredients, but when implementing in the real-world, you quickly miss the ability to include attachments from the email in the issue. Below, I solve this by using Azure Functions.
Design
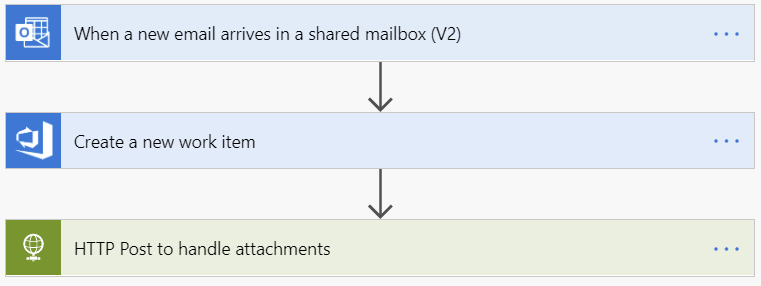
In this flow we want to monitor a shared mailbox, to which users can send incidents. The issues get created in DevOps, after which an Azure Function will extract the attachments and update the Issue with the files.
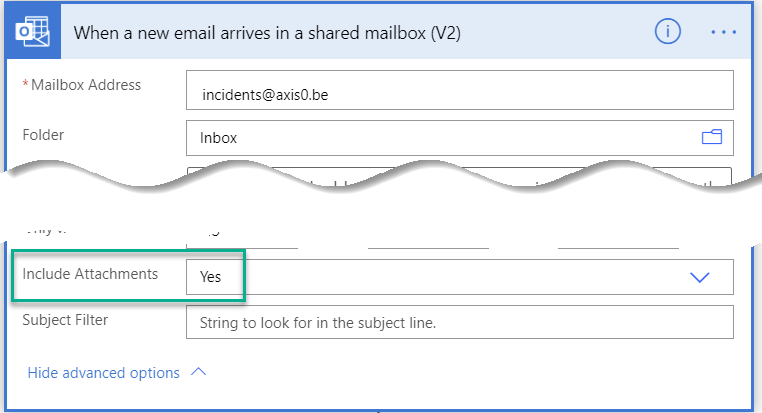
Monitor shared mailbox
Create a shared mailbox, this has the advantage that no personal accounts are involved, and replies seem to come from the same team.
Create Issue in DevOps
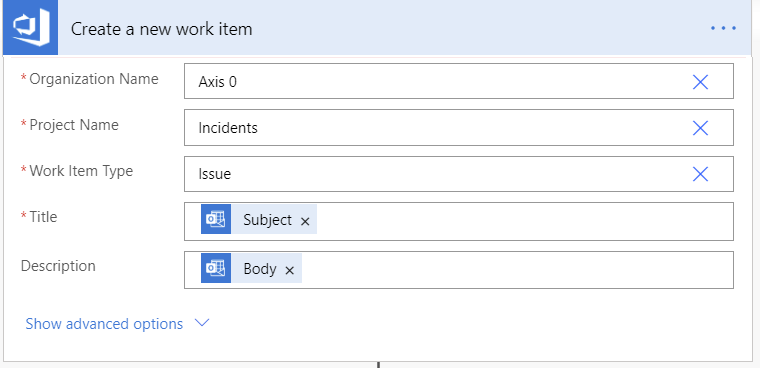
Using a shared access key, this action connects to DevOps. You could extend the functionality by providing a project name as part of the subject, but in my case I want all issues to be triaged manually, to know to which project they belong. Taking out the relevant data, the DevOps task is created.
HTTP call to trigger Azure Function
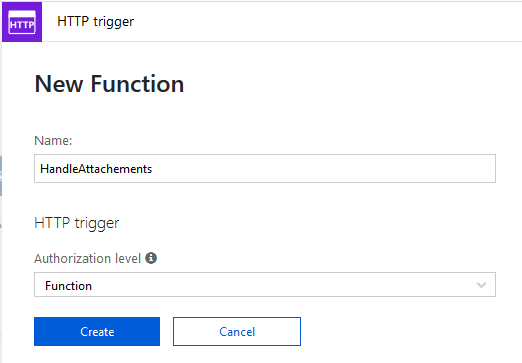
Create Function
- Create an Azure Function. Make it a HTTP triggered function, with Function Authorization Level.
- Replace the run.csx file with below code. The code will process all attachments and update the issue.
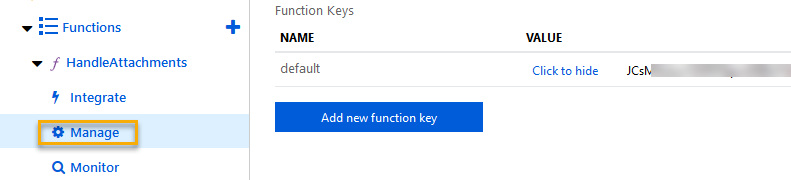
Note that you’ll have to provide a DevOps access token, which you can obtain in DevOps, under the Personal Access Tokens menu - From the Manage section in the Functions portal, retrieve the default function key, which we’ll need in the setup in PowerAutomate
#r "Newtonsoft.Json"

using System.Net;
using System.IO;
using System.Text;
using System.Web;
using Microsoft.AspNetCore.Mvc;
using Microsoft.Extensions.Primitives;
using Newtonsoft.Json;

public static async Task<IActionResult> Run(HttpRequest req, ILogger log)
{
    string requestBody = await new StreamReader(req.Body).ReadToEndAsync();
    dynamic data = JsonConvert.DeserializeObject(requestBody);

    string name = data?.name;
    string workItemId = data?.workItemId;
    string projectName = data?.projectName;
    string orgName = "Axis 0";
    string tokenFromDevops = @"your-very-long-token-retrieved-from-devops";
    string base64Token = Convert.ToBase64String(System.Text.ASCIIEncoding.ASCII.GetBytes(string.Format("{0}:{1}", "", tokenFromDevops)));
    string urlDevopsOrgAddAttach = @"https://dev.azure.com/" + orgName + "/_apis/wit/attachments?api-version=5.0&fileName=";

    foreach (var a in data.attachments)
    {
        string attachmentBytes = a.contentBytes;
        string attachmentFileName = a.name;
        attachmentFileName = HttpUtility.UrlEncode(attachmentFileName);  // to avoid spaces and other strange characters in the filename
        var bytesFromB = Convert.FromBase64String(attachmentBytes);
        string url = urlDevopsOrgAddAttach + attachmentFileName;

        HttpWebRequest request = (HttpWebRequest)WebRequest.Create(url);
        request.KeepAlive = false;
        request.Method = "POST";
        request.Headers.Add("Authorization", "Basic " + base64Token);
        request.ContentType = "application/octet-stream";
        Stream requestStream = request.GetRequestStream();
        requestStream.Write(bytesFromB, 0, bytesFromB.Length);
        requestStream.Close();

        HttpWebResponse response = (HttpWebResponse)request.GetResponse();
        var rspUploadAttachment = new StreamReader(response.GetResponseStream()).ReadToEnd();
        dynamic jsonResponse = JsonConvert.DeserializeObject(rspUploadAttachment);
        String urlUploadedAttachment = jsonResponse.url;

        // link attachment with workitem
        string urlWorkItem = @"https://dev.azure.com/" + orgName + "/" + projectName + "/_apis/wit/workitems/" + workItemId + "?api-version=5.0";
        HttpWebRequest requestAttach = (HttpWebRequest)WebRequest.Create(urlWorkItem);
        requestAttach.Method = "PATCH";
        requestAttach.Accept = "application/json";
        requestAttach.Headers.Add("Authorization", "Basic " + base64Token);
        requestAttach.ContentType = "application/json-patch+json";

        string jsonAttach = @"[
  {
    'op': 'add',
    'path': '/fields/System.History',
    'value': 'Adding files from PowerAutomate'
  },
  {
    'op': 'add',
    'path': '/relations/-',
    'value': {
      'rel': 'AttachedFile',
      'url': 'urlReplaceToken',
      'attributes': {
        'comment': 'Attachment added from PowerAutomate'
      }
    }
  }
]";

        jsonAttach = jsonAttach.Replace("urlReplaceToken", urlUploadedAttachment);
        using (var streamWriter = new StreamWriter(requestAttach.GetRequestStream()))
            {
                streamWriter.Write(jsonAttach);
                streamWriter.Flush();
           }

        HttpWebResponse responseAttach = (HttpWebResponse)requestAttach.GetResponse();
        var rspAddAttachment = new StreamReader(responseAttach.GetResponseStream()).ReadToEnd();
    }

    return (name != null ? (ActionResult)new OkObjectResult($"WorkItem created!")
                         : new BadRequestObjectResult("Missing name in the input"));
}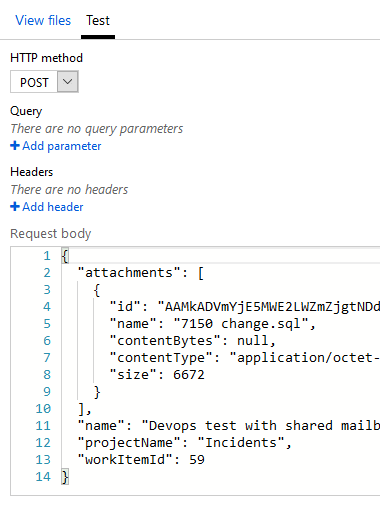
Test function
Using the portal, you can test the working of the function easily. With the console, you’ll detect the error message while running the function.
Link it all up
Finally, configure the action to call the function.
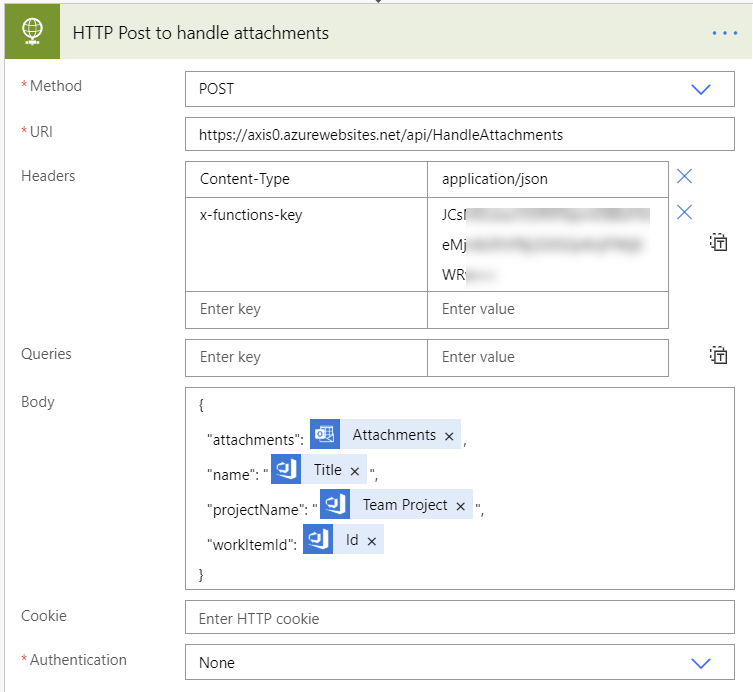
The method is POST, and the URI is your function.
Make sure to specify the Content-Type application/json header first.
The second header has to be x-functions-key with the function key retrieved in step 3 above. This will authenticate the call to the function.
The Body has to be the JSON consisting of the properties attachments, name, projectName, workItemId for this specific Function. Feel free to add other information which you can extract in the Function above.
That’s it. Test the flow, and when you do get an error, test the Function separately with the Body generated in the Flow test log.
Conclusion
Using Azure Functions to implement missing functionally provides a smooth experience to both develop, test and extend a PowerAutomate flow. No longer downloading and uploading of attachments to issues, when automating the issue creation process.
Read More
Other articles on Power Automate: Scaling Power Automate using an Azure Queue
Marten
Hello,
I cannot get this function to work – I am not terribly experienced in azure or functions, so I cannot find the information to provide inputs for testing the function. What do you use for the testing input variables? should the personal access token be associated with the account that created the function, or can it belong to the account creating the flow?